Getting started
Notifuse includes an interactive Setup Wizard that makes installation easy. Many environment variables are optional and can be configured through the web interface on first launch.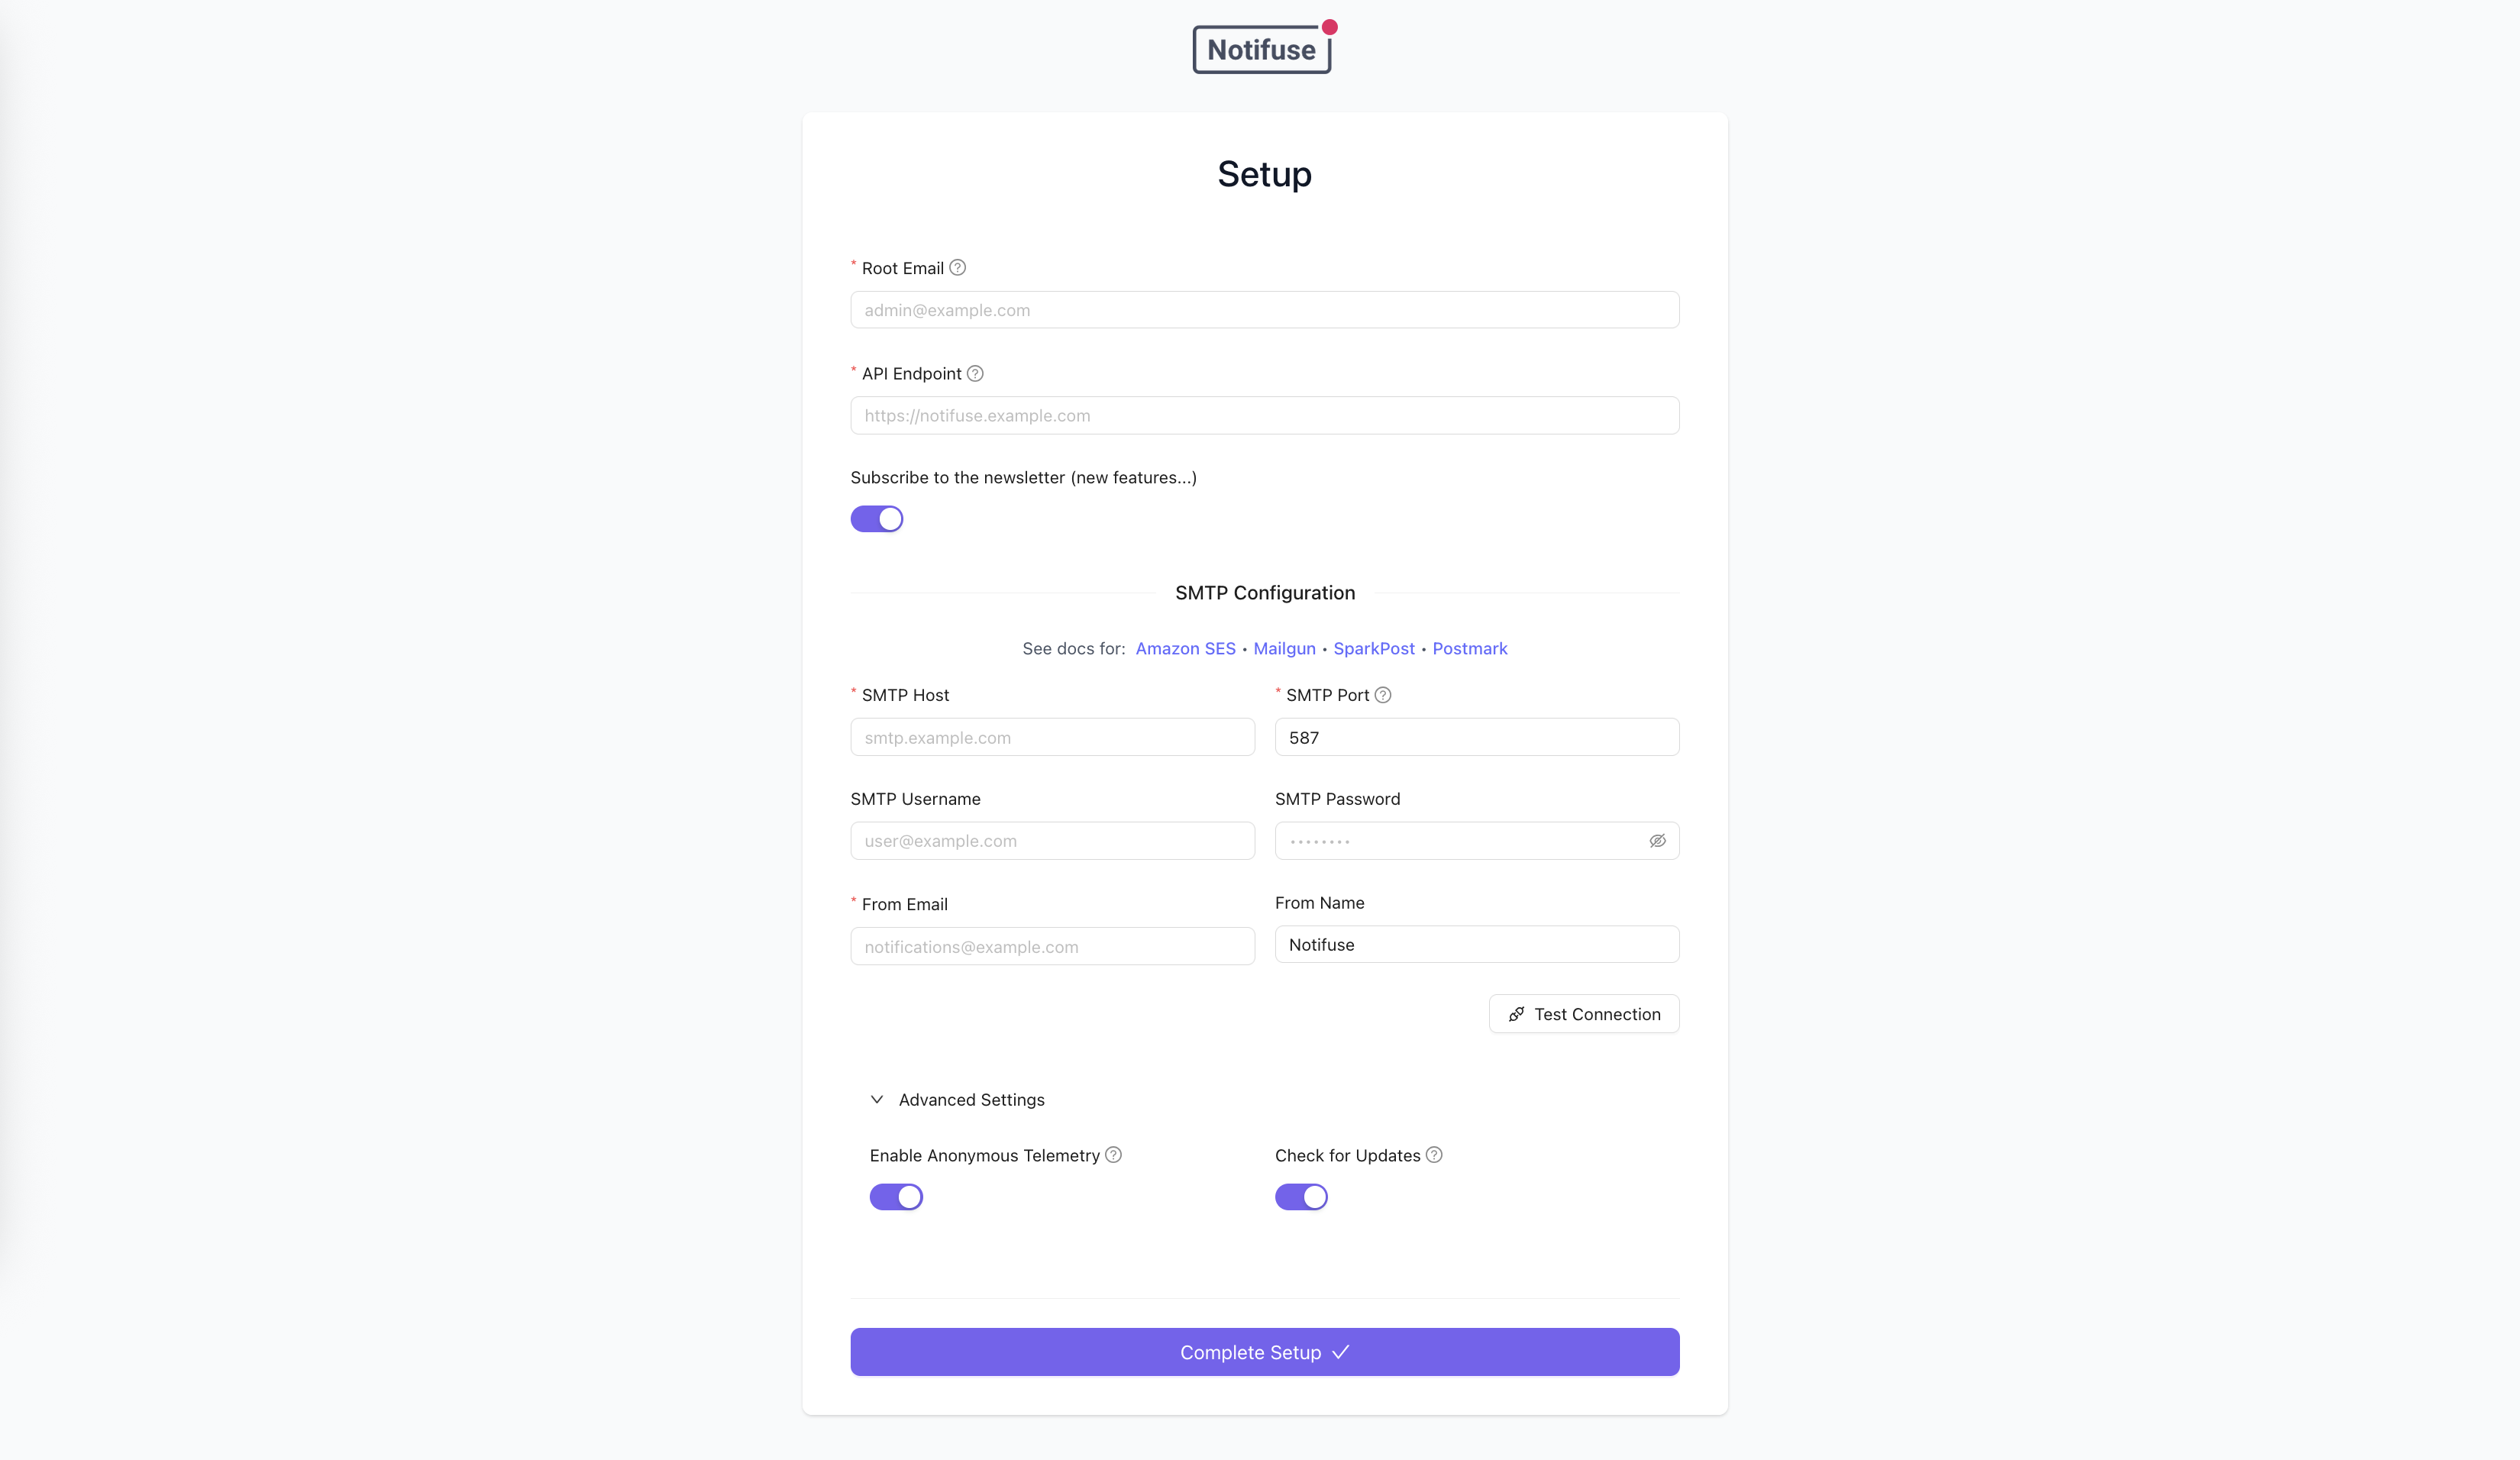
Quick Start with Setup Wizard
- Deploy Notifuse using one of the options below
- Access your instance in a web browser
- Complete the Setup Wizard:
- Enter your root administrator email
- Configure your API endpoint
- Set up SMTP settings
- Start using Notifuse!
Option 1: Docker Compose (Recommended for testing)
This option includes an embedded PostgreSQL database for easy testing and development:8081 with a PostgreSQL database.
On first launch, you’ll be guided through the Setup Wizard to configure your instance. Alternatively, you can configure environment variables in a .env file or directly in the compose.yaml.
Option 2: Standalone Docker (Production)
For production deployments, use the standalone Docker image with your own PostgreSQL database:PostgreSQL database (Option 2 only)
If using the standalone Docker option, you can use any PostgreSQL database with root credentials. Notifuse automatically creates a system database for itself. Recommended version: PostgreSQL 17 or higher A new database will be created for each Notifuse workspace to avoid multi-tenant issues (that’s why you need root credentials). Note: This is not required when using Docker Compose as PostgreSQL is included.An SMTP server
Notifuse needs an SMTP server to send system emails (e.g. password reset emails, invitation emails, etc.). If using SES, you can create SMTP credentials in the SMTP settings section of the SES dashboard.A public API endpoint
Notifuse needs a public API endpoint to be accessible from the web. Example:https://emails.yourcompany.com
Environment Variables
With the Setup Wizard, many environment variables are optional and can be configured through the web interface. Environment variables always take precedence over database settings when present.Required Variables
| Variable | Description |
|---|---|
DB_HOST | PostgreSQL host (e.g., localhost or db.yourcompany.com) |
DB_PORT | PostgreSQL port (e.g., 5432) |
DB_USER | Database username (e.g., postgres) |
DB_PASSWORD | Database password (e.g., postgres) |
SECRET_KEY | Secret key for encryption (generate with command below) |
Application Variables (Optional with Setup Wizard)
These variables can be configured via the Setup Wizard on first launch, or set as environment variables. Environment variables always override wizard settings.| Variable | Description |
|---|---|
ROOT_EMAIL | Root administrator email (e.g., admin@yourcompany.com) |
API_ENDPOINT | Public API endpoint URL (e.g., https://emails.yourcompany.com) |
SMTP_HOST | SMTP server host (e.g., smtp.gmail.com) |
SMTP_PORT | SMTP server port (e.g., 587 or 465) |
SMTP_USERNAME | SMTP username (e.g., noreply@yourcompany.com) |
SMTP_PASSWORD | SMTP password (e.g., your_smtp_password) |
SMTP_FROM_EMAIL | From email address (e.g., noreply@yourcompany.com) |
SMTP_FROM_NAME | From name (e.g., Your Company Name) |
SMTP_EHLO_HOSTNAME | Custom EHLO hostname for SMTP connections (e.g., mail.yourdomain.com). Defaults to SMTP host value when empty. Useful when SMTP servers reject EHLO localhost. |
Optional Variables
| Variable | Description | Default |
|---|---|---|
| Server Configuration | ||
SERVER_PORT | Port for the server to listen on (e.g., 8080) | 8080 |
SERVER_HOST | Host address to bind to (e.g., 0.0.0.0) | 0.0.0.0 |
CORS_ALLOW_ORIGIN | CORS allowed origins (e.g., https://yourapp.com,https://admin.yourapp.com) | * |
ENVIRONMENT | Environment mode (e.g., production) | production |
LOG_LEVEL | Logging level (e.g., debug or warn) | info |
| Database Configuration | ||
DB_PREFIX | Database table prefix (e.g., notifuse) | notifuse |
DB_NAME | Database name (e.g., notifuse_system) | ${DB_PREFIX}_system |
DB_SSLMODE | SSL mode for database (e.g., require or disable) | require |
DB_MAX_CONNECTIONS | Total max connections across all databases (e.g., 100) | 100 |
DB_MAX_CONNECTIONS_PER_DB | Max connections per workspace database (e.g., 3) | 3 |
DB_CONNECTION_MAX_LIFETIME | Maximum lifetime of a connection (e.g., 10m) | 10m |
DB_CONNECTION_MAX_IDLE_TIME | Maximum idle time before closing connection (e.g., 5m) | 5m |
| Task Scheduler Configuration | ||
TASK_SCHEDULER_ENABLED | Enable internal task scheduler (e.g., true or false) | true |
TASK_SCHEDULER_INTERVAL | Task execution interval in seconds (e.g., 30) | 30 |
TASK_SCHEDULER_MAX_TASKS | Maximum concurrent tasks (e.g., 10) | 10 |
| Privacy Settings | ||
TELEMETRY | Send anonymous usage statistics (e.g., true or false) | true |
CHECK_FOR_UPDATES | Check for new versions (e.g., true or false) | true |
| SMTP Bridge Configuration | ||
SMTP_BRIDGE_ENABLED | Enable SMTP bridge server for transactional emails (e.g., true or false) | false |
SMTP_BRIDGE_PORT | SMTP bridge port (e.g., 587 for STARTTLS, 465 for implicit TLS) | 587 |
SMTP_BRIDGE_DOMAIN | Public domain name for SMTP bridge (e.g., smtp.yourdomain.com) | localhost |
SMTP_BRIDGE_TLS | TLS posture: starttls, implicit, or off (see below). Auto-resolves when unset. | auto |
SMTP_BRIDGE_TLS_CERT_BASE64 | Base64-encoded TLS certificate (required for starttls and implicit) | - |
SMTP_BRIDGE_TLS_KEY_BASE64 | Base64-encoded TLS private key (required for starttls and implicit) | - |
| Tracing Configuration | ||
TRACING_ENABLED | Enable tracing (e.g., true) | false |
TRACING_SERVICE_NAME | Service name for tracing (e.g., notifuse-production) | notifuse-api |
TRACING_SAMPLING_PROBABILITY | Sampling probability (e.g., 0.05) | 0.1 |
TRACING_TRACE_EXPORTER | Trace exporter: jaeger/zipkin/stackdriver/datadog/xray/none (e.g., jaeger or datadog) | none |
TRACING_JAEGER_ENDPOINT | Jaeger endpoint (e.g., http://jaeger:14268/api/traces) | http://localhost:14268/api/traces |
TRACING_ZIPKIN_ENDPOINT | Zipkin endpoint (e.g., http://zipkin:9411/api/v2/spans) | http://localhost:9411/api/v2/spans |
TRACING_STACKDRIVER_PROJECT_ID | Stackdriver project ID (e.g., my-gcp-project-id) | - |
TRACING_AZURE_INSTRUMENTATION_KEY | Azure Monitor instrumentation key (e.g., 12345678-1234-1234-1234-123456789012) | - |
TRACING_DATADOG_AGENT_ADDRESS | Datadog agent address (e.g., datadog-agent:8126) | localhost:8126 |
TRACING_DATADOG_API_KEY | Datadog API key (e.g., 1234567890abcdef1234567890abcdef) | - |
TRACING_XRAY_REGION | AWS X-Ray region (e.g., us-east-1) | us-west-2 |
TRACING_AGENT_ENDPOINT | General agent endpoint (e.g., monitoring-agent:8126) | localhost:8126 |
TRACING_METRICS_EXPORTER | Metrics exporter: stackdriver/prometheus/datadog/none (e.g., prometheus) | none |
TRACING_PROMETHEUS_PORT | Prometheus metrics port (e.g., 9464) | 9464 |
SMTP Bridge Configuration
The SMTP Bridge feature allows you to connect SaaS applications that only provide SMTP integration (like Supabase Auth, Firebase, Auth0, etc.) to Notifuse. This gives you full control over email designs and branding using Notifuse’s MJML editor, instead of being stuck with default SaaS templates. See SMTP Bridge usage documentation for examples of how to send emails once configured.TLS Modes
The bridge supports three TLS postures viaSMTP_BRIDGE_TLS:
| Mode | Description | Typical port |
|---|---|---|
starttls | Listens plaintext; clients must upgrade via STARTTLS before AUTH. Default when certs are provided. | 587 |
implicit | TLS-from-byte-1 (SMTPS). Required for clients that only speak implicit TLS. | 465 |
off | No TLS. Only safe when fronted by a TLS-terminating reverse proxy (HAProxy, Caddy layer4, stunnel, nginx Mail, Postfix) on a trusted network. | any |
SMTP_BRIDGE_TLS is unset, Notifuse picks starttls if both cert and key are provided, otherwise off in development.
Production Setup with Let’s Encrypt
For production deployments, use valid TLS certificates from Let’s Encrypt using certbot with DNS challenges.Step 1: Install Certbot
Step 2: Generate Certificate with DNS Challenge
DNS challenge is recommended because it doesn’t require opening port 80 or 443, and works even if your SMTP server is on a different port.Step 3: Add DNS TXT Record
Add the TXT record to your DNS provider:Step 4: Encode Certificates to Base64
After certbot successfully generates the certificates, encode them to base64:Step 5: Add to Environment Variables
Copy the base64-encoded values to your.env file:
Certbot automatically sets up a renewal cron job. After certificate renewal, you’ll need to
re-encode the certificates to base64 and update your environment variables.
Development Setup with Self-Signed Certificates
For local development, you can use self-signed certificates:Configuration Management
Setup Wizard vs Environment Variables- Setup Wizard: Ideal for quick deployments and testing. Configuration is stored securely in the database and can be managed through the web interface.
- Environment Variables: Recommended for production deployments. Provides better security for sensitive data and allows configuration management through your deployment pipeline.
- Priority: Environment variables always take precedence over database settings when both are present.