
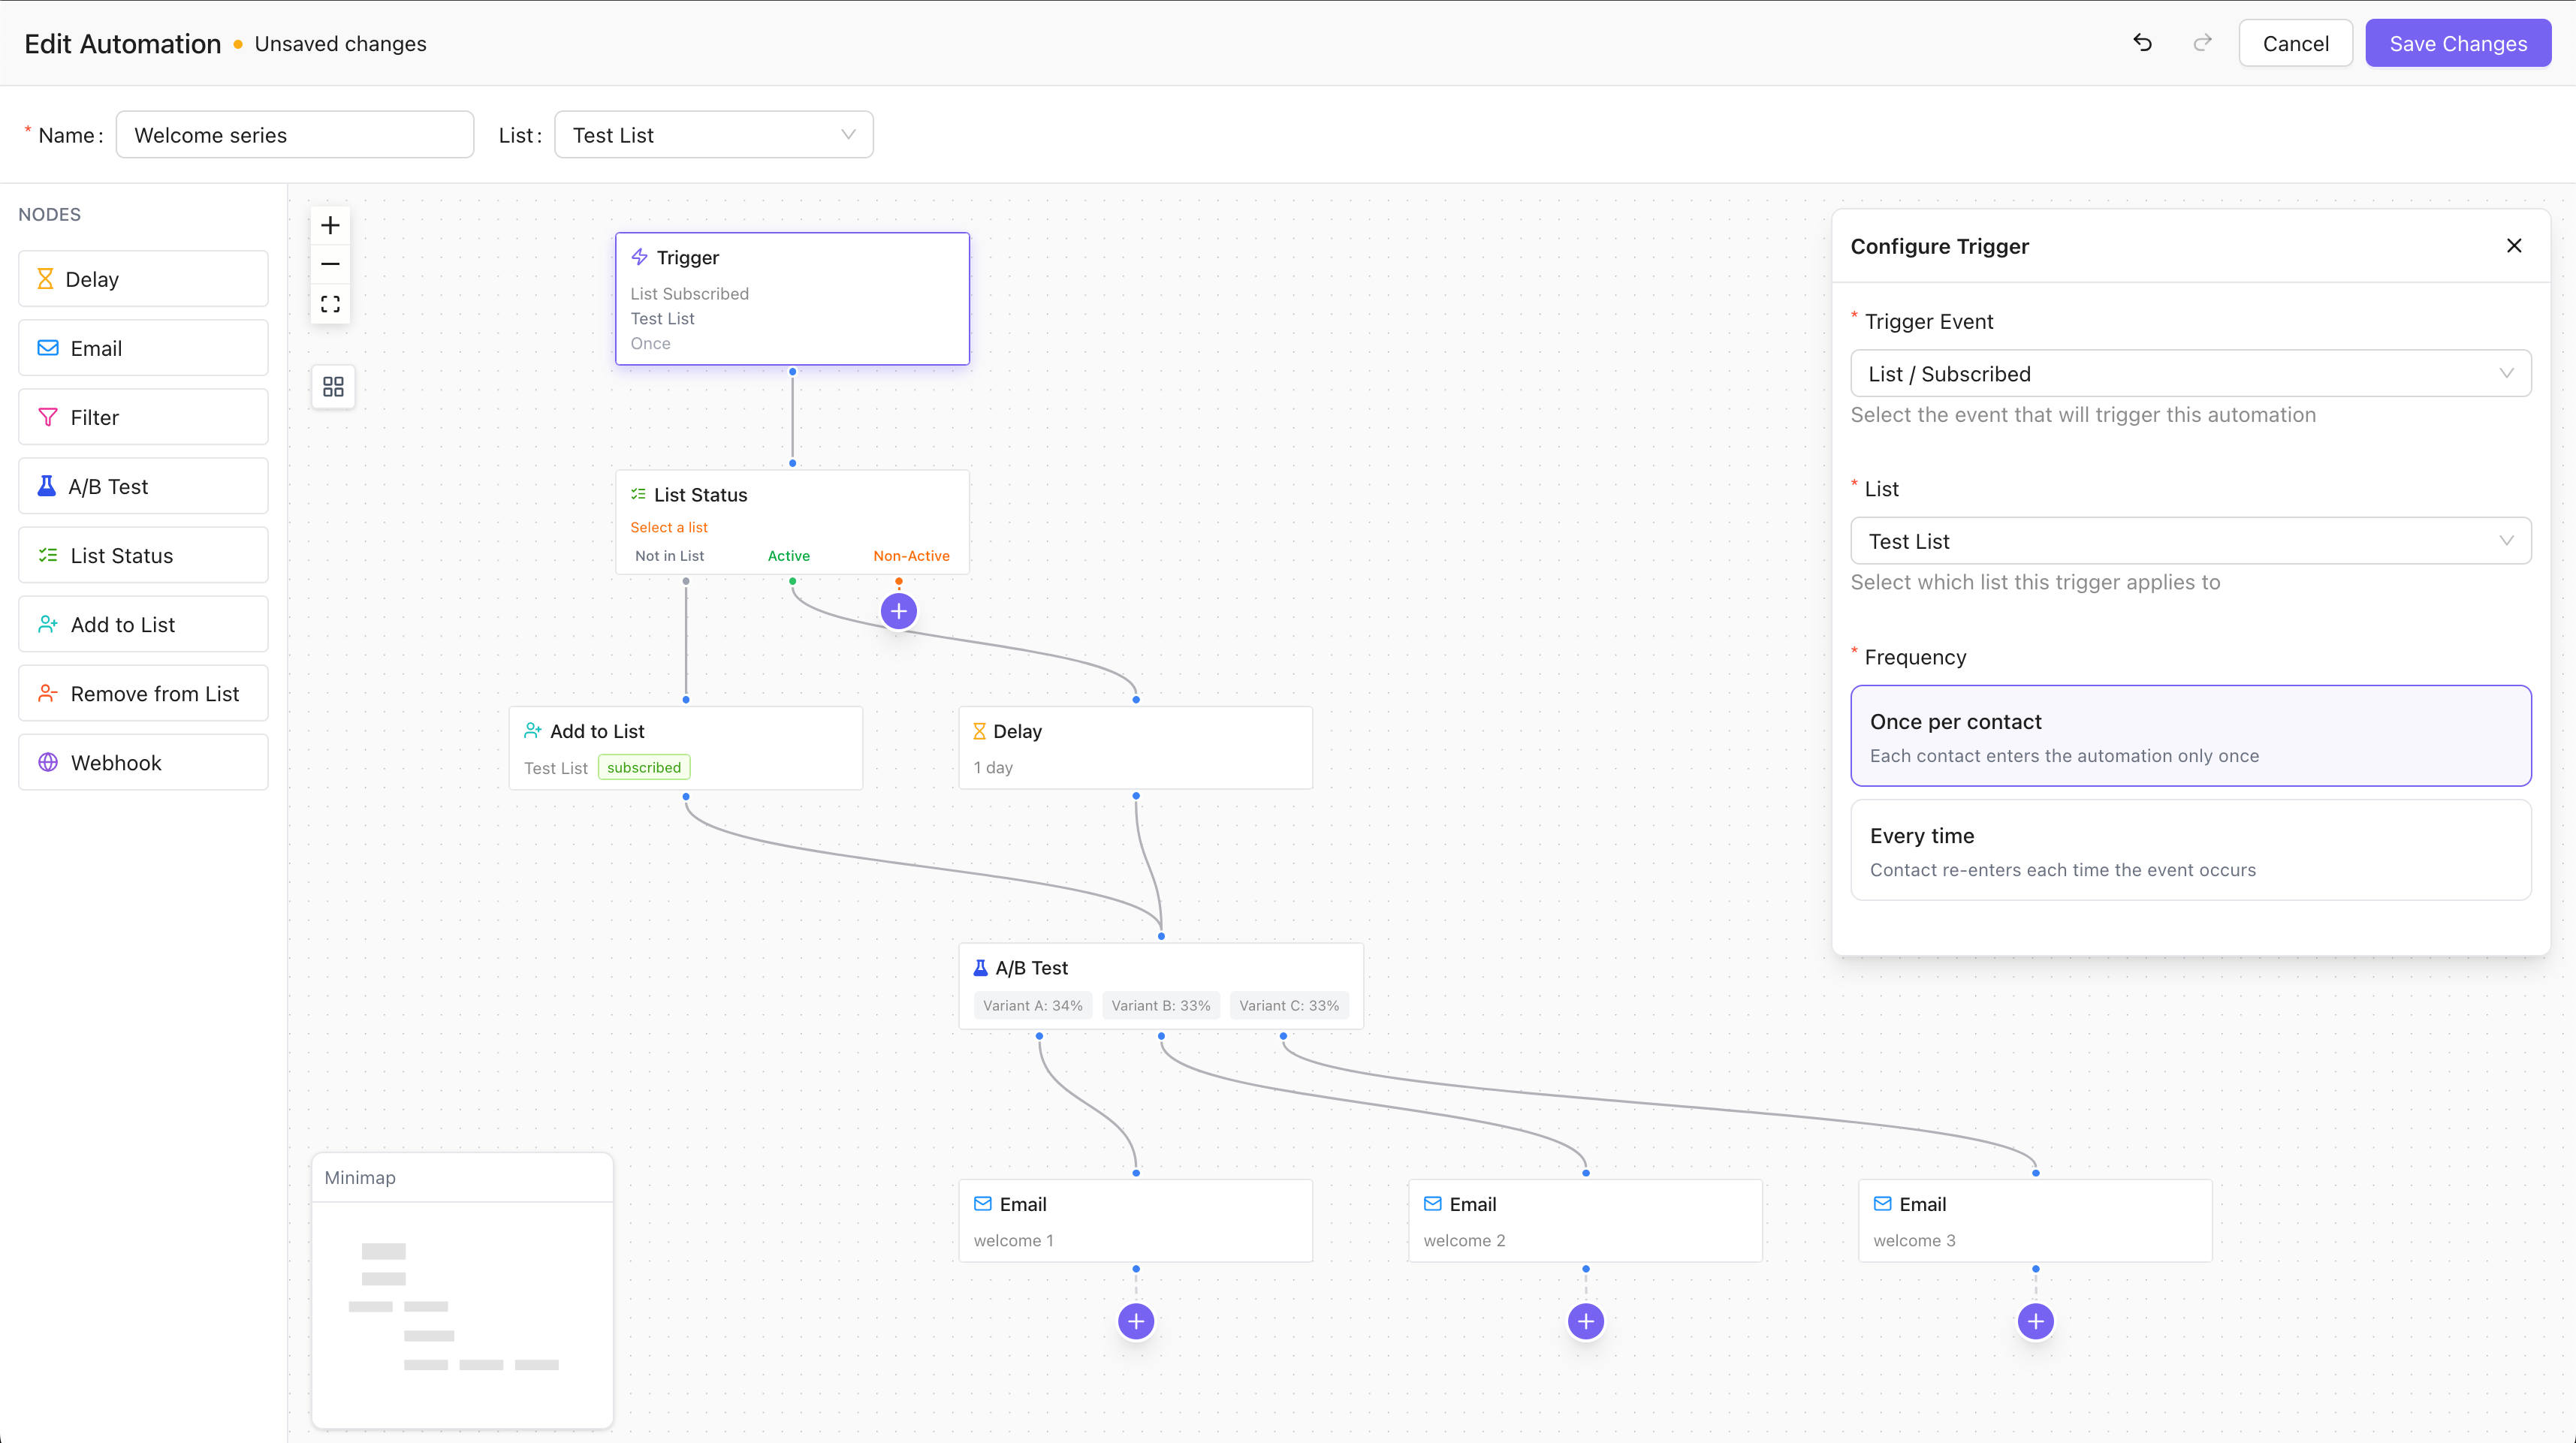
- Automated nurturing: Welcome sequences, onboarding flows, re-engagement campaigns
- Triggered emails: Send the right message at the right moment based on contact actions
- Behavioral responses: React to email opens, clicks, bounces, and custom events
Automation Lifecycle
Automations have three states that control their behavior:
Workflow:
- Create automation in Draft mode
- Configure trigger and add nodes
- Activate to go live and start enrolling contacts
- Pause when needed—active contacts continue their journey
- Delete performs soft-delete with recovery capability
Triggers
Triggers define when contacts enter an automation. They’re based on events that appear in the contact timeline.Trigger Frequency
Event Types
Automations can trigger on any of these timeline events:Contact Events
List Events
Segment Events
Email Events
Custom Events
Field-Specific Triggers
Forcontact.updated events, you can filter by specific fields that changed:
Core Fields: first_name, last_name, phone, external_id, timezone, language, photo_url
Address Fields: address_line_1, address_line_2, country, state, postcode
Custom Fields:
- String:
custom_string_1throughcustom_string_5 - Number:
custom_number_1throughcustom_number_5 - Date:
custom_datetime_1throughcustom_datetime_5 - JSON:
custom_json_1throughcustom_json_5
Conditional Triggers
Add segment conditions to filter which contacts enter the automation. For example:- Trigger on
list.subscribedbut only for contacts wherecountry = "US" - Trigger on
contact.updatedbut only whencustom_number_1 > 100
conditions field.
They use the same condition builder as segments and the Filter node.
A contact who does not match is never enrolled — which differs from placing a Filter node after the
trigger. With Once per contact, a contact enrolled and then sent down a Filter node’s “No” path has
used up their single enrollment and cannot enter later; an entry condition leaves it available.
A condition counting timeline activity includes the event that fired the trigger. “Has opened at least
3 emails” on an
email.opened trigger therefore enrols on the third open, not the fourth. When several
events are recorded in the same operation — a bulk import, for instance — all of them are visible to
each other’s conditions.Node Types
Nodes are the building blocks of automation workflows. They’re divided into action nodes (linear flow) and branching nodes (multi-path). Every node also takes an optional description—a short note of your own, set at the top of the node’s configuration panel. It appears under the node’s title on the canvas and in Flow Stats, so a sequence of Email and Delay nodes explains its intent without opening each one. It has no effect on execution.Action Nodes
Branching Nodes
Node Details
Delay Node
Pauses the contact’s journey for a specified duration before continuing to the next node.- Duration: 1 to 365
- Unit:
minutes,hours, ordays
Email Node
Sends an email template to the contact.- Template ID: Required. Select from workspace templates.
- Subject Override: Optional. Replace template subject line.
- From Override: Optional. Replace sender email/name.
Filter Node
Routes contacts based on segment conditions. Contacts matching the conditions continue on the “Yes” path; others take the “No” path or exit. Uses the same condition builder as segments—supports contact fields, custom events, and complex AND/OR logic.A/B Test Node
Splits contacts into variants for testing different paths.- Variants: 2 to 4 variants (A, B, C, D)
- Weights: Each variant has a weight (1-100%), must sum to 100%
- Deterministic: Same contact + node always gets the same variant (uses FNV-32a hash)
List Status Branch Node
Routes contacts based on their subscription status in a specific list:Webhook Node
Sends contact and automation data to an external URL via HTTP POST.- URL: Required. Must start with
http://orhttps:// - Secret: Optional. Sent as
Authorization: Bearer {secret}header
Visual Flow Editor
The visual flow editor provides a drag-and-drop canvas for building automation workflows.Building Workflows
- Start with Trigger: Every automation begins with a trigger node
- Add Nodes: Use the node palette or floating ”+” buttons on unconnected outputs
- Connect Nodes: Drag connections between nodes
- Configure: Click a node to open its configuration panel
Exit on Reply
When a contact replies to an email an automation sent, you usually want to stop the rest of the sequence—continuing to send scheduled emails to someone who already responded is a poor experience. Enable Exit on reply on an automation to handle this automatically.Enabling it
Toggle Exit on reply in the automation’s settings when creating or editing it. Once enabled, a genuine reply to any email that automation sent will exit the contact’s journey (recorded with thereplied exit reason).
How replies are matched
A reply is matched to the exact email it responds to using the standard threading headers (In-Reply-To / References) against the Message-ID Notifuse set when it sent the email. Because the match is precise:
- Only the specific automation the contact replied to exits. If a contact is enrolled in several automations, replying to one does not exit the others.
- Replies that can’t be matched to a known send are ignored—no journey is exited.
What counts as a reply
Not every inbound message is treated as a reply:
Matched replies appear on the contact timeline as
email.replied (or email.auto_reply for auto-responders).
The stop holds even when the next email is mid-delay or already queued for sending, so a contact who replies won’t receive the next scheduled email.
Contact Journeys
Each contact’s progress through an automation is tracked as a “journey” with full execution history.Journey States
Exit Reasons
When a contact exits early, the reason is recorded:Timeline Events
Automation activity is recorded in the contact timeline:automation.start— Contact enrolled in automationautomation.end— Contact completed, exited, or failed
Execution Engine
Automations run on a background scheduler that processes contacts through their workflows.How It Works
- Polling: Scheduler runs every 10 seconds
- Batching: Contacts are processed in batches for efficiency
- Fair Distribution: Round-robin across workspaces
Node Processing
- Multi-node execution: Up to 10 nodes processed per tick (prevents runaway loops)
- Crash recovery: State is persisted after each node
- Delay handling: Delay nodes schedule future execution at
scheduled_attime
Retry Logic
When node execution fails:- Increment retry count
- Schedule retry with exponential backoff: 1min, 2min, 4min, 8min…
- After max retries (default: 3), mark as
failed
Statistics
Track automation performance with built-in statistics.Automation-Level Stats
Node-Level Stats
Each node tracks:- Entered: Contacts that reached this node
- Completed: Successfully processed
- Failed: Encountered errors
- Skipped: Bypassed (e.g., wrong branch)
Permissions
Automations answer to the Automations permission: read opens automations and their complete node graphs, plus one named contact’s journey; write creates, edits and deletes them, and activates or pauses them. See Admins & API Keys.Best Practices
- Start simple: Begin with trigger → delay → email, then add complexity
- Use filters wisely: Segment contacts within flows for targeted messaging
- Test before going live: Use a small test list before activating for production
- Monitor statistics: Review enrolled, completed, and failed counts regularly
- Check execution logs: Debug issues using the contact journey history
- Name meaningfully: Use descriptive automation names for easy identification
- Consider frequency: Choose
oncevsevery_timebased on your use case